Total Pageviews

Showing posts with label Chrome Extension. Show all posts

2016/12/08

[Chrome Extension] Background Pages

A common need for extensions is to have a single long-running script to manage some task or state. Background pages to the rescue.

Assume I have a simple requirement, I hope it will print current timestamp each 3 seconds in background.

Steps are as bellows:

1. Define background scripts in manifest.json
 1
 2
 3
 4
 5
 6
 7
 8
 9
10
11
12
13
14
15
16
17
18
19
20
21
22
23
{
  "manifest_version": 2,
  "name": "Build Chrome Extension With AngularJS",
  "description": "利用 AngularJS 建置 Chrome Extension ",
  "version": "1.0",
  "permissions": [ "activeTab", "storage"],
  "browser_action": {
    "default_icon": "img/icon.png",
    "default_popup": "todo.html",
    "default_title": "Build Chrome Extension With AngularJS"
  },
   "commands": {
    "_execute_browser_action": {
      "suggested_key": {
        "default": "Alt+Shift+D"
      }
    }
  },
  "background": {
    "scripts": ["js/background.js"]
  },
  "options_page": "options.html"
}


2. Create background.js
 1
 2
 3
 4
 5
 6
 7
 8
 9
10
11
12
13
var myVar = setInterval(myTimer, 3000);

function myTimer() {
    var now = new Date();
    var year = now.getFullYear();
    var month = now.getMonth() + 1;
    var date = now.getDate();
    var hour = now.getHours();
    var minutes = now.getMinutes();
    var seconds = now.getSeconds();
    var time = year + '/' + month + '/' + date + ' ' + hour + ':' + minutes + ':' + seconds;
    console.log(time);
}


3. Reload extensions and open background page to test


2016/12/06

[Chrome Extension] Use the chrome.storage API to store, retrieve, and track changes to user data

Requirement
I would like to store user data for my chrome extension, I can use either storage.sync or storage.local. 
When using storage.sync, the stored data will automatically be synced to any Chrome browser that the user is logged into, provided the user has sync enabled.

In the following example, I will utilize storage.sync to fulfill this requirement


How-To
Steps are as bellows:
1. Add options_page and storage permissions in manifest.json 
 1
 2
 3
 4
 5
 6
 7
 8
 9
10
11
12
13
14
15
16
17
18
19
20
{
  "manifest_version": 2,
  "name": "Build Chrome Extension With AngularJS",
  "description": "利用 AngularJS 建置 Chrome Extension ",
  "version": "1.0",
  "permissions": [ "activeTab", "storage"],
  "browser_action": {
    "default_icon": "img/icon.png",
    "default_popup": "todo.html",
    "default_title": "Build Chrome Extension With AngularJS"
  },
   "commands": {
    "_execute_browser_action": {
      "suggested_key": {
        "default": "Alt+Shift+D"
      }
    }
  },
  "options_page": "options.html"
}


2. Add options.html
 1
 2
 3
 4
 5
 6
 7
 8
 9
10
11
12
13
14
15
16
17
18
19
20
21
22
23
24
<!DOCTYPE html>
<html>
<head>
    <title>設定初始工作</title>
    <meta http-equiv="Content-Type" content="text/html; charset=utf-8">
    <script src="js/angular.min.js"></script>
    <script src="js/bootstrap.min.js"></script>
    <link href="css/bootstrap.min.css" rel="stylesheet" media="screen">
    <script src="js/options.js"></script>
</head>

<body>
    <div ng-app="optionsApp" ng-controller="optionController" class="container" >
        <div class="row">
            <label>inital task:</label>
            <input id="initialTask" name="initialTask" ng-model='initialTask' autofocus="true">
            <button id="save" class="btn btn-primary btn-md" ng-click="addInitialTask()">
                <i class="glyphicon glyphicon-pencil"></i>
            </button>
        </div>        
    </div>

</body>
</html>


3. Add options.js
 1
 2
 3
 4
 5
 6
 7
 8
 9
10
11
12
13
14
15
16
17
18
19
20
21
22
23
24
25
26
27
28
angular.module('optionsApp', [])
    .controller('optionController', function($scope) {
      
      $scope.initialTask = '';

      $scope.addInitialTask = function () {
        var initialTask = $scope.initialTask;
        // Save data using the Chrome extension storage API.
        chrome.storage.sync.set({
          'initialTask' : initialTask
        }, 
        function () {
          alert("設定成功!");
        });
      }
});

function init(){
  // Get data using the Chrome extension storage API.
  chrome.storage.sync.get(
      'initialTask'
  , function(data) {
    document.getElementById('initialTask').value = data.initialTask;   
  });
}

// call init function as page loaded
document.addEventListener('DOMContentLoaded', init);


4. Reload extension and do test


Reference
[1] https://developer.chrome.com/extensions/storage

2016/12/05

[Chrome Extension] Create a simple chrome extenstion with AngularJS 1.X

The steps are as bellows:

1. Download AngularJS 1 from https://angularjs.org/

2. Download Bootstrap from https://getbootstrap.com/

3. Create manifest.json
 1
 2
 3
 4
 5
 6
 7
 8
 9
10
11
12
{
  "manifest_version": 2,
  "name": "Build Chrome Extension With AngularJS",
  "description": "利用 AngularJS 建置 Chrome Extension ",
  "version": "1.0",
  "permissions": [ "activeTab" ],
  "browser_action": {
    "default_icon": "img/icon.png",
    "default_popup": "todo.html",
    "default_title": "Build Chrome Extension With AngularJS"
  }
}

4. Create popup window
 1
 2
 3
 4
 5
 6
 7
 8
 9
10
11
12
13
14
15
16
17
18
19
20
21
22
23
24
25
26
27
28
29
30
31
32
33
34
35
36
<!DOCTYPE html>
<html style="min-width:220px;">
    <head>
        <meta charset="UTF-8">
        <meta name="viewport" content="width=device-width, initial-scale=1">
        <title>Todo list Page</title>
        <script src="js/angular.min.js"></script>
        <script src="js/todo.js"></script>
        <script src="js/bootstrap.min.js"></script>
        <link href="css/bootstrap.min.css" rel="stylesheet" media="screen">
    </head>

    <body>
        <div ng-app="todoApp" ng-controller="todoController" class="container">
            <form id='myForm'>
                <div class="row">
                    <input type="text" ng-model="task">
                    <button class="btn btn-primary btn-xs" ng-click="addTask()">
                        <i class="glyphicon glyphicon-plus"></i>
                    </button>
                </div>               
            </form>

            <div class="row">
                <ul>
                    <li ng-repeat="t in tasks track by $index">{{ t }} 
                        <button class="btn btn-default btn-xs" ng-click="deleteTask()">
                            <i class="glyphicon glyphicon-minus"></i>
                        </button>
                    </li>
                </ul>
            </div>
            
        </div>
    </body>
</html>


5. Create a JS file for popup window
 1
 2
 3
 4
 5
 6
 7
 8
 9
10
11
12
13
14
15
16
17
18
19
20
21
22
23
24
angular.module('todoApp', [])
    .controller('todoController', function($scope) {

        $scope.tasks = [];
        
        $scope.addTask = function() {
            if(isNotEmptyOrUndefined($scope.task)){
                 $scope.tasks.push($scope.task);
                $scope.task = '';
            } else {
                alert('task name cannot be null');
            }           
        }
        
        $scope.deleteTask = function() {
            $scope.tasks.splice(this.$index, 1);
        }

});

// 檢查是串是否不為空值且不為undefined
function isNotEmptyOrUndefined(str) {
    return str != '' && !angular.isUndefined(str) && str != null;
}


6. Install to Chrome and do test


Source code: https://github.com/junyuo/ChromeExtensions/tree/master/ChromeExtensionWithAngular

2016/12/04

[Chrome Extension] Create a simple chrome extenstion to search picture in Flicker

Steps are as bellows:

1. Create manifest.json
 1
 2
 3
 4
 5
 6
 7
 8
 9
10
11
12
{
  "manifest_version": 2,
  "name": "搜尋Flicker照片",
  "description": "Flicker Search Extension",
  "version": "1.0",
  "permissions": [ "activeTab" ],
  "browser_action": {
    "default_icon": "icon.png",
    "default_popup": "helloworld.html",
    "default_title": "搜尋Flicker照片"
  }
}


2. Get icons
icon for chrome extension: https://goo.gl/7x1ID8
icon for pupup window: https://goo.gl/YldO4J


3. Create pop up window
 1
 2
 3
 4
 5
 6
 7
 8
 9
10
11
12
13
14
15
16
<!DOCTYPE html>
<html style="min-width:210px;">
    <head>
        <meta charset="UTF-8">
        <title>Hello Page</title>
        <script src="helloWorld.js"></script>
    </head>

    <body>
        <form id='myForm'>
            <img src="magnifier.png" height="20" width="20">
            <input type="text" id="queryString" style="width:100px">
            <button type="submit" id="doSearch">Search</button>
        </form>
    </body>
</html>


4. Create a JS file for popup window
 1
 2
 3
 4
 5
 6
 7
 8
 9
10
11
12
13
14
15
16
17
18
19
20
21
/* The DOMContentLoaded event is fired when the initial HTML document 
 * has been completely loaded and parsed, without waiting for stylesheets, 
 * images, and subframes to finish loading.
 */
document.addEventListener('DOMContentLoaded', function() {

    var searchBtn = document.getElementById('doSearch'); 

    // Execute the following steps as user click Search button       
    searchBtn.addEventListener('click', function(){      
        // Gets query string 
        var queryString = document.getElementById('queryString').value;

        // Create URL with query string
        var newUrl = 'https://www.flickr.com/search/?q='+queryString;

        // Creates a new tab.
        chrome.tabs.create({ url : newUrl});
    }, false);

}, false);   


5. Install to Chrome and do Test


Source code: https://goo.gl/sSRCz0

2016/11/09

[Chrome Extension] How to adjust the width of popup window ?

Problem
In chrome extension, we will create a html file which will be rendered inside the popup window that's created in response to a user's click on the browser action. 

I hope the image, search input text and search button are in the same row. 
But it display in difference row.


How do I adjust the width of the popup window?

The popup window html content looks like:
 1
 2
 3
 4
 5
 6
 7
 8
 9
10
11
12
13
14
15
16
<!DOCTYPE html>
<html>
    <head>
        <meta charset="UTF-8">
        <title>Hello Page</title>
        <script src="helloWorld.js"></script>
    </head>

    <body>
        <form id='myForm'>
            <img src="magnifier.png" height="20" width="20">
            <input type="text" id="queryString" style="width:100px">
            <button type="submit" id="doSearch">Search</button>
        </form>
    </body>
</html>


How-to
You can set the width of html tag. The updated popup window html content looks like:
 1
 2
 3
 4
 5
 6
 7
 8
 9
10
11
12
13
14
15
16
<!DOCTYPE html>
<html style="min-width:210px;">
    <head>
        <meta charset="UTF-8">
        <title>Hello Page</title>
        <script src="helloWorld.js"></script>
    </head>

    <body>
        <form id='myForm'>
            <img src="magnifier.png" height="20" width="20">
            <input type="text" id="queryString" style="width:100px">
            <button type="submit" id="doSearch">Search</button>
        </form>
    </body>
</html>

See it works!

Reference
[1] https://stackoverflow.com/questions/5020953/popup-html-change-width


2016/11/08

[Chrome Extension] Hello World Example

1. Create a manifest.json
In this manifest, I will declare a browser action, and the activeTab permission
 1
 2
 3
 4
 5
 6
 7
 8
 9
10
11
{
  "manifest_version": 2,
  "name": "Hello World",
  "description": "My first Chrome extension",
  "version": "1.0",
  "permissions": [ "activeTab" ],
  "browser_action": {
    "default_icon": "icon.png",
    "default_popup": "helloworld.html"
  }
}


2. Resources
Download a icon.png as an icon for this chrome extension


helloWorld.html will be rendered inside the popup window that's created in response to a user's click on the browser action.
 1
 2
 3
 4
 5
 6
 7
 8
 9
10
11
<!DOCTYPE html>
<html>
    <head>
        <meta charset="UTF-8">
        <title>Hello Page</title>
    </head>

    <body>
    Hello! It is my first Chrome extension!!!!
    </body>
</html>

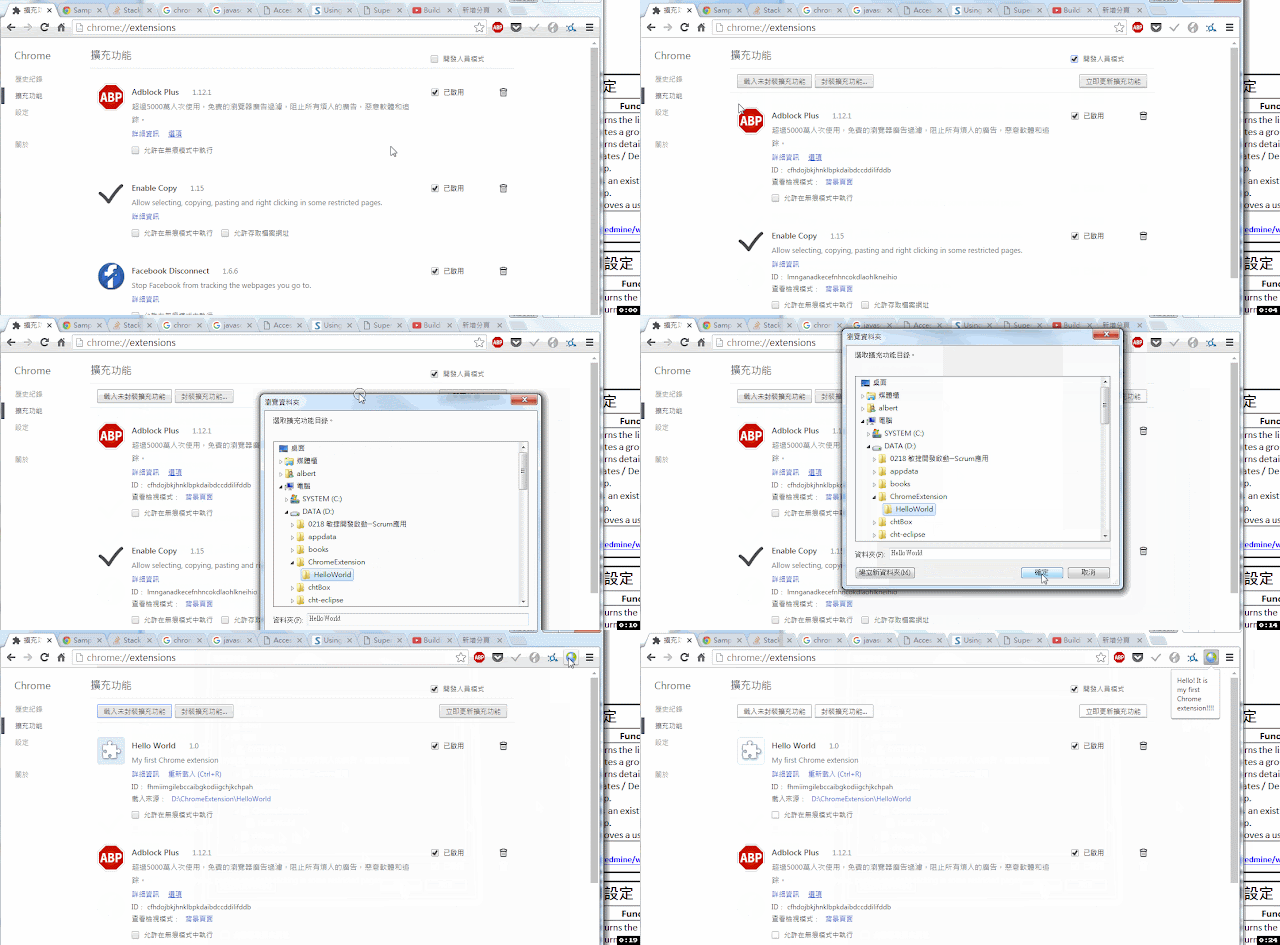
3. Load the extension and test (remember to turn on developer mode)


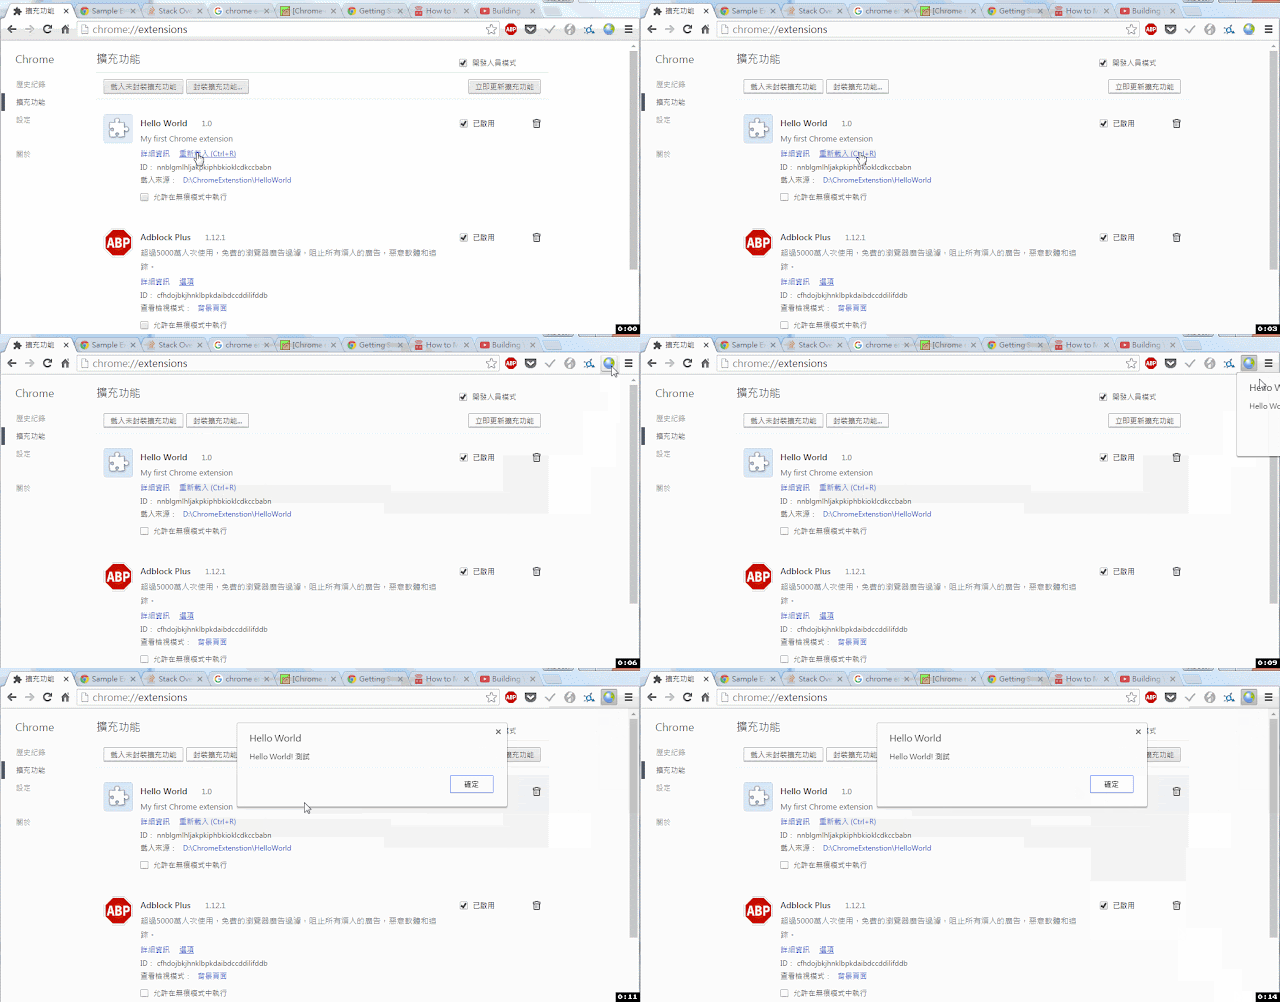
If I would like to show a JavaScript alert message

1. Create a helloWorld.js
alert("Hello World! 測試測試");

2. Import helloWorld.js into helloWorld.html
 1
 2
 3
 4
 5
 6
 7
 8
 9
10
11
12
<!DOCTYPE html>
<html>
    <head>
        <meta charset="UTF-8">
        <title>Hello Page</title>
        <script src="helloWorld.js"></script>
    </head>

    <body>
    Hello! It is my first Chrome extension!!!!
    </body>
</html>

3. Reload the hello world extension and test


Reference
[1] https://developer.chrome.com/extensions/getstarted