可以使用此網站,且支援繁體中文:https://www.wordclouds.com/
假設我有多筆消費者所在地的消費資料,將資料內容貼到 word list 中,並按下 [apply] 按鈕
如此即可輕鬆產生 word cloud
亦可選擇你想要儲存的圖片格式
Reference
[1] https://zi.media/@ez3c/post/LPTsAP
Total Pageviews
Showing posts with label Tools. Show all posts
Showing posts with label Tools. Show all posts
2019/06/11
2019/03/07
[Chrome] JSON Formatter Plugin
Problem
I am using Spring Actuator to monitor our app, gathering metrics, understanding traffic or the state of our database becomes trivial with this dependency.The main benefit of this library is that we can get production grade tools without having to actually implement these features ourselves.
Actuator is mainly used to expose operational information about the running application – health, metrics, info, dump, env, etc.
And it will provide information for me with JSON format:
But the JSON is not formatted, how to format the output JSON?
How-To
Install Chrome plugin to fulfill this requirement: https://chrome.google.com/webstore/detail/json-formatter/bcjindcccaagfpapjjmafapmmgkkhgoa/
Labels:
Tools
2019/02/10
[Tool] [SoapUI] How to setup SOAP Web Service HTTP Basic Authentication
Scenario
How-To
Here has two steps to set up HTTP Basic Authentication :
Step 1. Invoke context menu, and choose "Show Interface Viewer"
Step 2. Fill in user name and password.
How-To
Here has two steps to set up HTTP Basic Authentication :
Step 1. Invoke context menu, and choose "Show Interface Viewer"
Step 2. Fill in user name and password.
Labels:
Tools
2019/02/09
[SoapUI] A class/interface with the same name "xxxx" is already in use. Use a class customization to resolve this conflict.
Problem
When I try to generate SOAP web service client code via SoapUI, I get naming conflict exception:
How-To
We can add customized argument in SoapUI to automatically resolve naming conflicts without requiring the use of binding customizations.
Reference
[1] http://cxf.apache.org/docs/wsdl-to-java.html
When I try to generate SOAP web service client code via SoapUI, I get naming conflict exception:
[ERROR] A class/interface with the same name "xxxx" is already in use. Use a class customization to resolve this conflict.
How-To
We can add customized argument in SoapUI to automatically resolve naming conflicts without requiring the use of binding customizations.
Reference
[1] http://cxf.apache.org/docs/wsdl-to-java.html
2019/01/14
[Tools] [Cmder] 如何修改開啟 Cmder 的初始路徑
Problem
我希望打開 Cmder 後,預設路徑是 F:\git
How-To
Settings => Startup => Tasks => {cmd:Cmder} => 增加 -new_console:d:"F:\git" => Save settings
我希望打開 Cmder 後,預設路徑是 F:\git
How-To
Settings => Startup => Tasks => {cmd:Cmder} => 增加 -new_console:d:"F:\git" => Save settings
Labels:
Tools
2019/01/13
[Tools] [Cmder] 繁體中文亂碼問題
Problem
當我透過 Cmder 要查看 commit history 時,發現 Cmder 無法正確顯示繁體中文
How-To
Settings => Startup => Environment => 在環境變數增加 set LANG=zh_TW.UTF8 => Save settings
關閉 Cmder,再看一次 git commit history,就可發現已可正常顯示中文
當我透過 Cmder 要查看 commit history 時,發現 Cmder 無法正確顯示繁體中文
How-To
Settings => Startup => Environment => 在環境變數增加 set LANG=zh_TW.UTF8 => Save settings
關閉 Cmder,再看一次 git commit history,就可發現已可正常顯示中文
Labels:
Tools
2019/01/04
[Java] [Tool] How to generate Java code from WSDL via SoapUI?
Problem
How to generate Java code from WSDL via SoapUI?
How-To
Assume I have a WSDL file: http://localhost:8080/ws/eaWs.wsdl
Prerequisite
1. Download SoapUI from https://www.soapui.org/
2. Download Java and set JAVA_HOME
3. Download Apache CXF from https://cxf.apache.org/download.html and set CXF_HOME
Steps to generate Java code from WSDL via SoapUI
1. File => New SOAP Project
2. Specify project name and WSDL
3. Right Click => Generate Code => Apache CXF
4. Click Tools to set Apache CXF path if you do not configure before
5. Specify Output Directory, Package
6. Specify encoding in Custom Args
7. Click Generate button
2018/12/11
[SQuirreL SQL Client] How to change font size and font type in SQL entry area ?
Problem
How to change font size and font type in SQuirreL SQL Client's SQL entry area ?
How-To
Step 1. File => New Session Properties
Step 2. Click SQL tab
Step 3. Change font in SQL entry area
Step 4. Close and launch SQuirreL SQL Client
How to change font size and font type in SQuirreL SQL Client's SQL entry area ?
How-To
Step 1. File => New Session Properties
Step 2. Click SQL tab
Step 3. Change font in SQL entry area
Step 4. Close and launch SQuirreL SQL Client
Labels:
Tools
2018/11/10
[SchemaSpy] How to generate SQL Server schema document via SchemaSpy
Steps
1. Download SchemaSpy jar from http://schemaspy.org/
2. Downnload and install Graphviz from https://www.graphviz.org/
3. Download JDBC jar file for your target database
4. Execute command as bellows:
Commonly used parameters
1. Download SchemaSpy jar from http://schemaspy.org/
2. Downnload and install Graphviz from https://www.graphviz.org/
3. Download JDBC jar file for your target database
4. Execute command as bellows:
java -jar "F:\lib\schemaspy-6.0.0-rc2.jar" -dp "F:\sqljdbc_6.0\sqljdbc42.jar" -t mssql05 -db MyDB -host 192.168.0.1 -port 1433 -u user -p secret -charset UTF-8 -o "F:\Schema" -hq
Commonly used parameters
- -jar: The location of schemaspy jar file
- -dp: NLooks for drivers here before looking in driverPath in [databaseType].properties. The drivers are usually contained in .jar or .zip files and are typically provided by your database vendor.
- -t: Type of database (e.g. ora, db2, etc.)
- -db: Name of database to connect to
- -host: Databas URL to connect to
- -port: Database port
- -u: Valid database user id with read access.
- -p: Valid password
- -charset: Assign character set
- -o: Directory to write the generated HTML/graphs to
- -hq: Generate either higher-quality diagrams.
Labels:
Database,
Microsoft SQL Server,
Tools
2018/07/10
[SQuirreL SQL Client] How to avoid An I/O error occurred while sending to the backend error
Problem
I am using SQuirreL SQL Client as my database client tool, but it is very annoying to get this error message when I do not use for a while:
This error results from connection session timeout, how can I keep session alive?
It's very annoying to re-connect again.
How-To
Here has the process to iron out this annoying error:
I am using SQuirreL SQL Client as my database client tool, but it is very annoying to get this error message when I do not use for a while:
An I/O error occurred while sending to the backend error
This error results from connection session timeout, how can I keep session alive?
It's very annoying to re-connect again.
How-To
Here has the process to iron out this annoying error:
2018/06/07
[Tools] How to format JSON string in Notepad++
Problem
How to format JSON string in Notepad++?
How-To
You can download JSONViewer Notepad++ plugin, https://sourceforge.net/projects/nppjsonviewer/?source=typ_redirect, to fulfill your requirement.
The process regarding download and configuration is as bellows:
You can select all text and use Plugins -> JSON Viewer -> Format JSON to do JSON format
Labels:
Tools
2017/08/09
[Squirrel SQL Client] Is it possible to have Squirrel SQL auto-resize the column width of the result set?
Problem
Is it possible to have Squirrel SQL auto-resize the column width of the result set?
How-To
Steps:
(1) move your mouse to query result grid
(2) right click on query result grid
(3) check "Always adjust all column widths"
Is it possible to have Squirrel SQL auto-resize the column width of the result set?
How-To
Steps:
(1) move your mouse to query result grid
(2) right click on query result grid
(3) check "Always adjust all column widths"
Labels:
Tools
2017/08/08
[Tools] [Text Compare] How to Compare Two Lengthy JSON String
Problem
I have two lengthy JSON String, if I would like to compare the difference between the two JSON string, how to do it?
How-To
Here are the steps to fulfill this requirement:
(1) connect to https://text-compare.com/
(2) copy first JSON string to left hand side
(3) copy second JSON string to right hand side
(4) click Compare button
(5) check the difference
Labels:
Tools
2017/02/09
[Sentry] Fail to Create a New Project via REST API
Problem
I am using spring boot to implement web application, and trying to use sentry's rest API to create a new sentry project. I get this exception as I use rest API:
I try to use Advanced REST Client to do test, it succeed. Why?

How-To
Owing this http request is triggered at server side, so we cannot use browser's developer tool to debug.
You can go to telerik to download fiddler to help us to do web debug and to figure out what's the response it returns to us.
Fiddler is a free web debugging proxy which logs all HTTP(s) traffic between your computer and the Internet. Use it to debug traffic from virtually any application that supports a proxy like IE, Chrome, Safari, Firefox, Opera and more.
Before using fiddler, you need to set proxy to spring boot to send web traffic to Fiddler.
You can see all requests in fiddler, it looks like:

We also see the bad request, and find out the problem results from the rest URL had unnecessary blank (%20)

The response looks like (sentry tell it violate CSRF problem, but the real problem is the wrong REST URL):

Reference
[1] https://docs.sentry.io/hosted/api/teams/post-team-project-index/
I am using spring boot to implement web application, and trying to use sentry's rest API to create a new sentry project. I get this exception as I use rest API:
1 2 3 4 5 | org.springframework.web.client.HttpClientErrorException: 403 OK at org.springframework.web.client.DefaultResponseErrorHandler.handleError(DefaultResponseErrorHandler.java:91) ~[spring-web-4.3.2.RELEASE.jar:4.3.2.RELEASE] at org.springframework.web.client.RestTemplate.handleResponse(RestTemplate.java:667) ~[spring-web-4.3.2.RELEASE.jar:4.3.2.RELEASE] at org.springframework.web.client.RestTemplate.doExecute(RestTemplate.java:620) ~[spring-web-4.3.2.RELEASE.jar:4.3.2.RELEASE] at org.springframework.web.client.RestTemplate.execute(RestTemplate.java:580) ~[spring-web-4.3.2.RELEASE.jar:4.3.2.RELEASE] |
I try to use Advanced REST Client to do test, it succeed. Why?

How-To
Owing this http request is triggered at server side, so we cannot use browser's developer tool to debug.
You can go to telerik to download fiddler to help us to do web debug and to figure out what's the response it returns to us.
Fiddler is a free web debugging proxy which logs all HTTP(s) traffic between your computer and the Internet. Use it to debug traffic from virtually any application that supports a proxy like IE, Chrome, Safari, Firefox, Opera and more.
Before using fiddler, you need to set proxy to spring boot to send web traffic to Fiddler.

You can see all requests in fiddler, it looks like:

We also see the bad request, and find out the problem results from the rest URL had unnecessary blank (%20)

The response looks like (sentry tell it violate CSRF problem, but the real problem is the wrong REST URL):

Reference
[1] https://docs.sentry.io/hosted/api/teams/post-team-project-index/
2017/02/05
[Testing Tool] Postman
I am using Redmine Rest API to implement my web application. For example, here has developer guide to teach us how to use rest API to find, create, update and delete project: https://www.redmine.org/projects/redmine/wiki/Rest_Projects
In order to make sure the JSON format for each action (i.e. CRUD) in request or response, we can make good use of Postman to assist us.
Installation
How-to
Firstly, we need to configure user name and password for logging into Redmine:

Secondly, we need to set content-type to application/json in Headers:

If I would like to test:

Reference
[1] https://www.getpostman.com/
[2] https://dzone.com/articles/12-great-web-service-testing-tools?utm_content=bufferba092&utm_medium=social&utm_source=twitter.com&utm_campaign=buffer
In order to make sure the JSON format for each action (i.e. CRUD) in request or response, we can make good use of Postman to assist us.
Installation
How-to
Firstly, we need to configure user name and password for logging into Redmine:

Secondly, we need to set content-type to application/json in Headers:

If I would like to test:
- List projects: GET /projects.json
- Select GET HTTP method, fill in URL and click Send button, then we can get the execution result
- Show a project: GET /projects/[id].json
- Select GET HTTP method, fill in URL and click Send button, then we can get the execution result
- Create a project: POST /projects.json
- Select POST HTTP method, fill in URL, prepare JSON string for creating a new project and click Send button, then we can get the execution result
- Update a project: PUT /projects/[id].json
- Select PUT HTTP method, fill in URL, prepare JSON string for updating project and click Send button, then we can get the execution result
- Delete a project: DELETE /projects/[id].json
- Select DELETE HTTP method, fill in URL and click Send button, then we can get the execution result

Reference
[1] https://www.getpostman.com/
[2] https://dzone.com/articles/12-great-web-service-testing-tools?utm_content=bufferba092&utm_medium=social&utm_source=twitter.com&utm_campaign=buffer
2015/01/23
How to Pixelate an Image in PicPick
Pixelation effect essentially lowers the definition of images, while increasing the size of the individual pixels, or dots, that make up images.
If you need to pixelate your image, you can try PicPick and it's free.
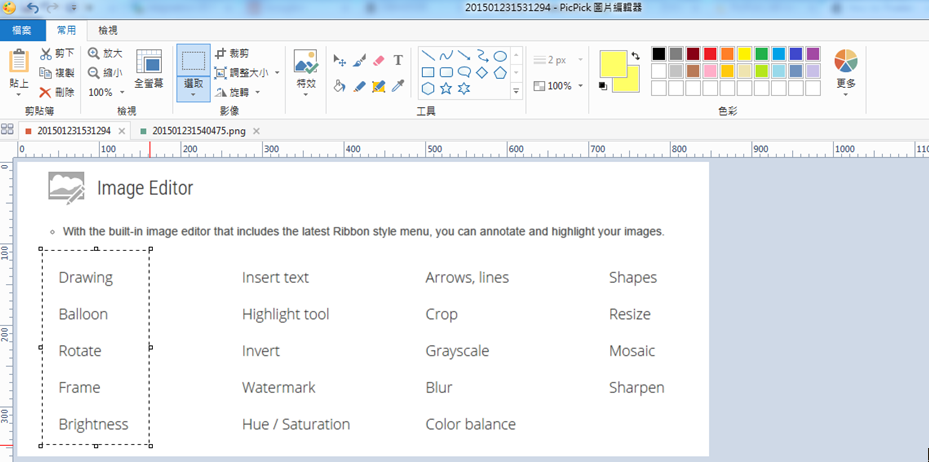
Step1. Open the existing file in PicPick
Step2. Click Choose
Step3. Choose the area you would like to do pixelate

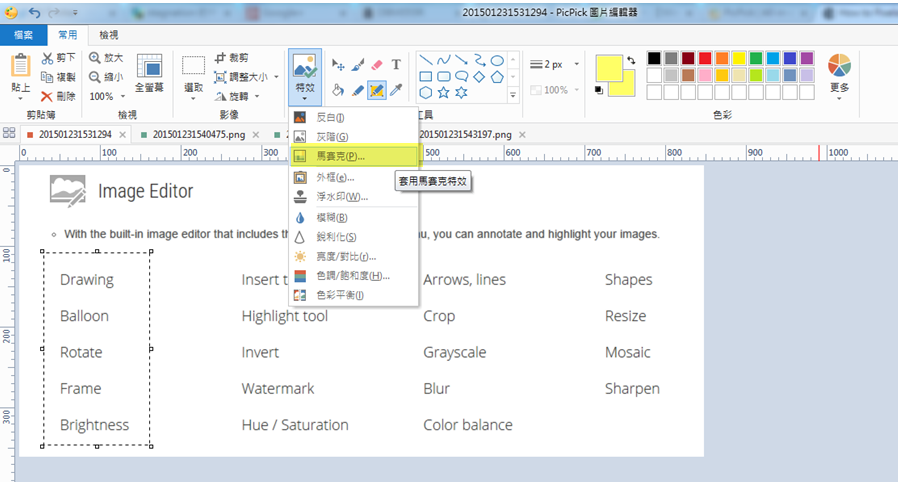
Step4. Click on the "Effects" button and then select the "Pixelate"option from the drop-down menu that appears.

Step5. In the "Pixelate" menu, drag the "Pixelate" slider to the right to add and increase the amount of pixelation applied to your image. Then click OK.
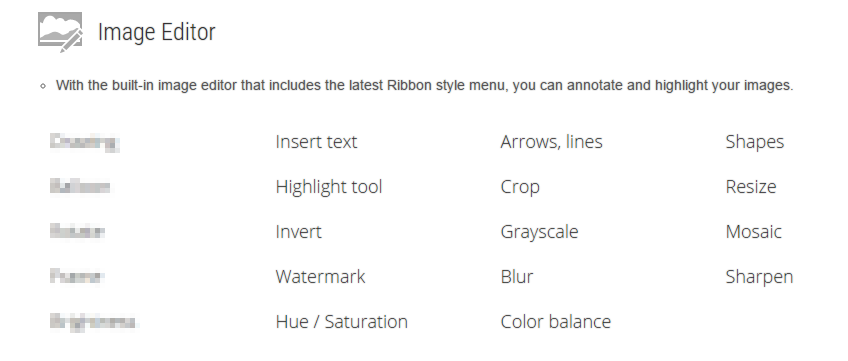
Check the result:

Reference
[1] http://www.picpick.org/en/features
[2] http://www.ehow.com/how_7307828_pixelate-image-using-photoshop.html
Labels:
Tools
Subscribe to:
Comments (Atom)


