Total Pageviews

2010/12/24

SchemaSpy Quick Start

Introduction
SchemaSpy is a Java-based tool (requires Java 5 or higher) that analyzes the metadata of a schema in a database and generates a visual representation of it in a browser-displayable format. It lets you click through the hierarchy of database tables via child and parent table relationships as represented by both HTML links and entity-relationship diagrams. It's also designed to help resolve the obtuse errors that a database sometimes gives related to failures due to constraints.

Running SchemaSpy
You run SchemaSpy from the command line: java -jar schemaSpy.jar -t dbType -db dbName [-s schema] -u user [-p password] -o outputDir
For further information, please check: http://schemaspy.sourceforge.net/

Execution Process
3. execute a command:
java -jar "C:\schemaSpy_5.0.0.jar" -dp "C:\ojdbc6.jar" -t orathin -db dev02 -s ap_tax -host 192.168.30.102 -port 1521 -u ap_tax -p taxtest -schemas AP_TAX -connprops "C:\schemaSpyGUI\properties\orathin.properties" -charset UTF-8 -o "C:\schemaSpyGUI\output" -norows -hq
4. check the output

java.lang.UnsatisfiedLinkError: no ocijdbc11 in java.library.path

Scenario
As I run SchemaSpy and use this command line:
java -jar "C:\schemaSpy_5.0.0.jar" -dp "C:\ojdbc6.jar" -t ora -db dev02 -s ap_tax -host 192.168.30.102 -port 1521 -u ap_tax -p taxtest -schemas AP_TAX -connprops "C:\schemaSpyGUI\properties\ora.properties" -charset UTF-8 -o "C:\schemaSpyGUI\output" -norows -hq

I got this error message:
 Failed to load driver [oracle.jdbc.driver.OracleDriver] from classpath [file:/C:/ojdbc6.jar]  
 Make sure the reported library (.dll/.lib/.so) from the following line can be  
 found by your PATH (or LIB*PATH) environment variable  
 java.lang.UnsatisfiedLinkError: no ocijdbc11 in java.library.path  
 at java.lang.ClassLoader.loadLibrary(ClassLoader.java:1734)  
 at java.lang.Runtime.loadLibrary0(Runtime.java:823)  
 at java.lang.System.loadLibrary(System.java:1028)  
 at oracle.jdbc.driver.T2CConnection$1.run(T2CConnection.java:3535)  
 at java.security.AccessController.doPrivileged(Native Method)  
 at oracle.jdbc.driver.T2CConnection.loadNativeLibrary(T2CConnection.java:3531)  
 at oracle.jdbc.driver.T2CConnection.logon(T2CConnection.java:266)  
 at oracle.jdbc.driver.PhysicalConnection.(PhysicalConnection.java:536)  
 at oracle.jdbc.driver.T2CConnection.(T2CConnection.java:162)  
 at oracle.jdbc.driver.T2CDriverExtension.getConnection(T2CDriverExtension.java:53)  
 at oracle.jdbc.driver.OracleDriver.connect(OracleDriver.java:521)  
 at net.sourceforge.schemaspy.SchemaAnalyzer.getConnection(SchemaAnalyzer.java:582)  
 at net.sourceforge.schemaspy.SchemaAnalyzer.analyze(SchemaAnalyzer.java:157)  
 at net.sourceforge.schemaspy.Main.main(Main.java:42) 

Root Cause
I assign wrong database type and connection property in command line.

Solution
Change database type from ora to orathin:
java -jar "C:\schemaSpy_5.0.0.jar" -dp "C:\ojdbc6.jar" -t orathin -db dev02 -s ap_tax -host 192.168.30.102 -port 1521 -u ap_tax -p taxtest -schemas AP_TAX -connprops "C:\schemaSpyGUI\properties\orathin.properties" -charset UTF-8 -o "C:\schemaSpyGUI\output" -norows -hq

2010/12/23

SQuirreL SQL Client Quick Start


Introduction
SQuirreL SQL Client is a graphical Java program that will allow you to view the structure of a JDBC compliant database, browse the data in tables, issue SQL commands etc

Prerequisite
1. download SQuirreL SQL Client from http://squirrel-sql.sourceforge.net/
2. download JDBC jar file, i.e. Oracle 11 JDBC jar file from http://www.oracle.com/technetwork/database/enterprise-edition/jdbc-112010-090769.html

Installation
1. use command line to execute jar file

2. It will pop up GUI window to install. Just do step by step

Click Next

Click Next

Click Next

Choose plug-ins if you need, and click next

Click Next

Launch SQuirreL SQL Client
1. Click squirrel-sql.bat (in windows platform) to launch this tool

2. Configure Jar file

3. Configure Database Connection

4. Connect to database

2010/12/22

11 tips for better code

1. keep methods short
2. never ever ever reuse a variable for different purpose
3. use self-descriptive variable and method names
4. define variables as close as possible to the place of their usage
5. no magic numbers
6. be friend with your language
7. don’t fight the convention
8. watch out for premature optimization
9. always refactor the code after you test it
10. don’t get sucked into overengineering
11. learn new things by prototyping

http://www.dzone.com/links/r/11_tips_for_better_code.html

2010/12/19

2010/12/17

AutoPagerize for Chrome

AutoPagerize is a browser Extension for auto loading paginated web pages. AutoPagerize use in many web site, and provide efficiently web browsing.


2010/12/10

12 programming mistakes to avoid

Programming mistake No. 1: Playing it fast and loose
Programming mistake No. 2: Overcommitting to details
Programming mistake No. 3: Not simplifying control
Programming mistake No. 4: Delegating too much to frameworks
Programming mistake No. 5: Trusting the client
Programming mistake No. 6: Not trusting the client enough
Programming mistake No. 7: Relying too heavily on magic boxes
Programming mistake No. 8: Reinventing the wheel
Programming mistake No. 9: Opening up too much to the user
Programming mistake No. 10: Overdetermining the user experience
Programming mistake No. 11: Closing the source
Programming mistake No. 12: Assuming openness is a cure-all

http://www.dzone.com/links/r/12_programming_mistakes_to_avoid.html

2010/12/04

cloc - count line of code

Introduction
cloc counts blank lines, comment lines, and physical lines of source code in many programming languages. Given two versions of a code base, cloc can also compute changes in blank, comment, and source lines. It is written entirely in Perl with no dependencies outside the standard distribution of Perl v5.6 and higher (code from some external modules is embedded within cloc) and so is quite portable. cloc is known to run on many flavors of Linux, Mac OS X, AIX, Solaris, IRIX, z/OS, and Windows.


Usage
[command]cloc-1.53.exe --not-match-f=.*Test --by-file --skip-uniqueness --skip-win-hidden --csv --report-file=[output-file] [source folder]

[example]cloc-1.53.exe --not-match-f=.*Test --by-file --skip-uniqueness --skip-win-hidden --csv --report-file=nig_loc.csv "D:\work\FDC\0.svn\trunk\SDS\source code"

output file

2010/12/03

How to align JSF h:outputText text to right?

Original Way

But it doesn't work
What we need to do is to add div tag to enclose outputText tag, and define text-align in div tag

It works now....

2010/12/01

The value of attribute "itemLabel" associated with an element type "null" must not contain the '<' character.

Environment: JSF 2.0 on GlassFish V3

[Error Message]
The value of attribute "itemLabel" associated with an element type "null" must not contain the '<' character.

Source Code 

Root Cause
The problem results from the itemValue cannot accept < in xhtml page

Solution
Move selectItems value and label to managed bean
 1
 2
 3
 4
 5
 6
 7
 8
 9
10
    //declare a List variable    
   public List compareList = new ArrayList();
 
    //declare a getter class
    public List getCompareList() {         
  compareList.clear();
  compareList.add(new SelectItem(">", ">"));
  compareList.add(new SelectItem("<", "<="));
  return compareList;     
 }

xhtml page should be updated to be like this:

Demo:

2010/11/02

PrimeFaces 2.X + JSF 2.0 Quick Start

Prerequisite
This example will apply facelets template. Therefore, concerning faceletes template topics, please refer to :

PrimeFaces 2.X + JSF 2.0 Quick Start

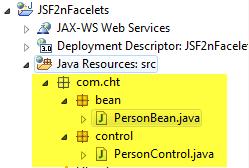
1. Create two classes: PersonBean.java and PersonControl.java


2. Create Person.java
Utilized annotation to declare managed bean and its scope instead of faces-config.xml

3. Create PersonControl.java
Utilized annotation to declare managed bean, ManagedProperty and its scope instead of faces-config.xml

4. Create index.xhtml
You will see this page only have one text filed for user to fill.

Two buttons in this page:
  • Submit button: click submit button as user fill in name
  • Clear button: click clear button to clear text field

5. Create hello.xhtml
Show welcome message in this page. And click home button to head for previous page.


6. Define navigation rule in faces-config.xml

7. Demo

User fill in name and click submit button

show welcome message in next page.


JSF2 + Facelets + PrimeFaces 2.2


1. Download PrimeFaces jar files from http://www.primefaces.org/downloads.html
2. Utilize JSF 2.0 and copy PrimeFaces-2.2.jar to WEB-INF/lib

3. you don't need to register servlet and servlet mapping in web.xml from JSF 2.0

4. You don't need to declare p:resources tag in head area

5. Create a simple page with 5 PrimeFaces command buttons in panel

6. Demo


Compare PrimeFaces 1.x with PrimeFaces 2.x

2010/11/01

One or more resources have the target of 'head', but no 'head' component has been defined within the view.


Environment: JSF 2 + Facelets + PrimeFaces 2.1 + Glassfish V3

As I run my test.xhtml, it will show this error message in console:
sourceId=null[severity=(ERROR 2), summary=(One or more resources have the target of 'head', but no 'head' component has been defined within the view.), detail=(One or more resources have the target of 'head', but no 'head' component has been defined within the view.)] sourceId=null[severity=(ERROR 2), summary=(One or more resources have the target of 'head', but no 'head' component has been defined within the view.), detail=(One or more resources have the target of 'head', but no 'head' component has been defined within the view.)]


You will see this javascript error in my browser

Root Cause: I need to edit my template.xhtml
[Before]

[After]

Demo

How to integrate JSF 2.0 with Facelets

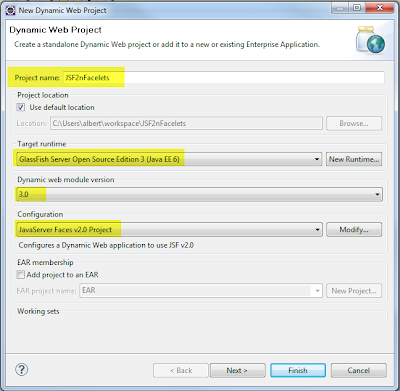
1. Create Dynamic Web Project. Assign project name, target runtime, dynamic web module version, and configuration.


2. Click Next

3. Click Next

4. Select JSF 2.0 in user library, and click finish.

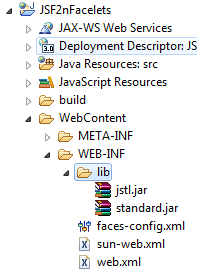
5. The Dynamic Web Project had been created. (NOTICE: you won't need jsf-facelets.jar anymore)

6. Edit web.xml. Added one context parameter.

7. You don't need to add view-handler in faces-config.xml

8. Create header template page

9. Create footer template page

10. Create template page. Including header, title, body, and footer area.

11. Create test.xhtml. Apply template.xhtml, and insert new contents into title area and body area.

12. Demo


Compare JSF 1.2 with JSF 2.0 concerning configurations: