Total Pageviews
2010/09/28
2010/09/19
2010/08/31
PrimeFaces Themes Configuration
1. Download theme files from http://www.primefaces.org/themes.html
2. Copy themes file to under WebContent/theme
3. Add the skin.css file to our template page using link tag.
If you would like to apply another theme file, just repeat step3.
4. And configure PrimeFaces not to add it's bundled default skin (sam).
flicker theme
blue sky theme
dark-Hive theme
If you have any problems with applying PrimeFaces theme, please check this link: http://albert-myptc.blogspot.com/2010/08/failed-to-apply-primefaces-theme.html
Labels:
PrimeFaces
Failed to Apply PrimeFaces Theme

As I downloaded theme files from http://www.primefaces.org/themes.html, and tried to apply it. But it does not work.
Solution
I utilized primefaces-1.0.2 to implement, but this version has bugs in applying theme. Therefore, as I change PrimeFaces jar file to primefaces-1.1, this problem was disappeared.
Labels:
PrimeFaces
2010/08/27
PrimeFaces + Facelets Configuration
1. With regard to facelets configuration, please check: http://albert-myptc.blogspot.com/2010/08/1.html
2. Download primefaces-1.0.2.jar from http://www.primefaces.org/downloads.html
3. Edit web.xml. Add Resource Servlet and servlet mapping
4. Add p:resources tag to head tag in template.xhtml
Resource component needs to be present on a page that has PrimeFaces components, this component outputs the link and script tags that are necessary for PrimeFaces components to work. The ideal place to put resources component would be the html head element.
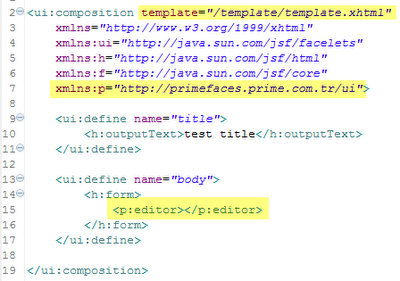
5. Create a test.xhtml, apply template.xhtml as its template page. And add p:editor in the body part.
6. Check the result
Labels:
Facelets,
JSF,
PrimeFaces
'PrimeFaces' is undefined
As I try to execute a simple PrimeFaces tag in my test.xhtml
it shows this JavaScript error
it results from I forget to add p:resources tag to head tag in my template.xhtml
Then it works correctly!
Labels:
JSF,
PrimeFaces
2010/08/26
Facelets Quick Start
1. download facelets jar file from https://facelets.dev.java.net/
2. copy jsf-facelets.jar to WEB-INF/lib
3. download jakarta-taglibs-standard jar files from
4. copy jstl.jar and standard.jar to WEB-INF/lib
5. add facelets initialization parameter in web.xml
6. add FaceletViewHandler in face-config.xml
7. ceate header.xhtml in template folder
8. create footer.xhtml in tempate folder
9. create template.xhtml in template folder
10. create test.xhtml which apply template.xhtml
11. check the result
Enable code completion in xhtml file (facelets)
[Problem] code completion function does not work in xhtml file

[Solution]
Window > Preferences
General > Content Types > Text > JSP
Add (xhtml)
Click OK
2010/08/23
How to install JSF in Eclipse 3.6
In this article, you will learn:

- how to install JSF library in Eclipse 3.6
- how to verify if my JSF application can run successfully or not
1. create a dynamic web project

3. Click Next Button
5. Click Download Library to download JSF library (for the first time(
6. Choose JSF 2.0 library and click next button
7. Check the checkbox and click Finish Button
8. Downloading
9. Click Finish button. You had finished your project creation process.
10. Added the two jar files into your classpath.
11. Java Build Path --> Add Jar...
12. selected the two jar files
13. Create a new JSP file
14. Assigned a name which named test
15. Choose JSP Template
16. create a simple JSF file
17. Run on Server
18. Click Finish
19. Check the result
Labels:
JSF
Subscribe to:
Comments (Atom)


