Total Pageviews

2016/04/09

[Java Mail] Use Velocity to generate HTML based email

Requirement
If we need to send email with html-based content and hope we can manage it in template file instead of in Java code, how to do it?

How To 
We can use Velocity to fulfill this requirement.

Remember to update your maven dependency first:
 1
 2
 3
 4
 5
 6
 7
 8
 9
10
11
12
13
14
15
16
17
18
19
20
21
22
23
24
25
26
27
28
29
30
31
32
 <!-- email -->
        <dependency>
            <groupId>javax.mail</groupId>
            <artifactId>mail</artifactId>
            <version>1.4.7</version>
            <scope>provided</scope>
        </dependency>

        <dependency>
            <groupId>jaf</groupId>
            <artifactId>activation</artifactId>
            <version>1.0.2</version>
            <scope>provided</scope>
        </dependency>

        <dependency>
            <groupId>org.springframework.integration</groupId>
            <artifactId>spring-integration-mail</artifactId>
            <version>4.2.5.RELEASE</version>
        </dependency>

        <!-- velocity -->
        <dependency>
            <groupId>org.apache.velocity</groupId>
            <artifactId>velocity</artifactId>
            <version>1.7</version>
        </dependency>
        <dependency>
            <groupId>org.apache.velocity</groupId>
            <artifactId>velocity-tools</artifactId>
            <version>2.0</version>
        </dependency>

Step1. Create velocity template
 1
 2
 3
 4
 5
 6
 7
 8
 9
10
11
12
13
14
15
16
17
18
<html>
   <body>
      <p>親愛的保戶您好</p>
      <p>     </p>
      <p>感謝您對xxxx的支持,您在網路上申請的旅平險保單已投保完成,以下是您的投保明細,供您參考。</p>
      <p>【投保內容】</p>
      <p>保單號碼: ${customer.policyNumber}</p>
      <p>被保險人: ${customer.name}</p>
      <p>申請日期: ${customer.applyDate}</p>
      <p>保險期間: ${customer.fromDate} ~ ${customer.toDate}</p>
      <p>旅遊地點: ${customer.place}</p>
      <p></p>
      <p>※保險單及保險費送金單將於近日內寄至要保人所指定之聯絡地址。</p>
      <p></p>
      <p>                     敬祝  闔家平安 </p>
      <p><img src="cid:panda"></p>
   </body>
</html>

This template located in :


Step2. Create Beans configuration in spring-beans.xml
 1
 2
 3
 4
 5
 6
 7
 8
 9
10
11
12
13
14
15
16
17
18
19
20
21
22
23
<beans xmlns="http://www.springframework.org/schema/beans"
 xmlns:context="http://www.springframework.org/schema/context"
 xmlns:mvc="http://www.springframework.org/schema/mvc" xmlns:xsi="http://www.w3.org/2001/XMLSchema-instance"
 xsi:schemaLocation="
        http://www.springframework.org/schema/beans     
        http://www.springframework.org/schema/beans/spring-beans-3.0.xsd
        http://www.springframework.org/schema/context 
        http://www.springframework.org/schema/context/spring-context-3.0.xsd
        http://www.springframework.org/schema/mvc
        http://www.springframework.org/schema/mvc/spring-mvc-3.0.xsd">

 <bean id="velocityEngine"
  class="org.springframework.ui.velocity.VelocityEngineFactoryBean">
  <property name="velocityProperties">
   <props>
    <prop key="resource.loader">class</prop>
    <prop key="class.resource.loader.class">
     org.apache.velocity.runtime.resource.loader.ClasspathResourceLoader
    </prop>
   </props>
  </property>
 </bean>
</beans>


Step3. Write test code
 1
 2
 3
 4
 5
 6
 7
 8
 9
10
11
12
13
14
15
16
17
18
19
20
21
22
23
24
    public static void main(String[] args) throws IOException, MessagingException {

        ApplicationContext context = new ClassPathXmlApplicationContext("spring-beans.xml");
        VelocityEngine velocityEngine = (VelocityEngine) context.getBean("velocityEngine");

        // set value to template
        Customer customer = new Customer();
        customer.setPolicyNumber("12345678");
        customer.setName("測試");
        customer.setApplyDate("20160325");
        customer.setFromDate("20160401");
        customer.setToDate("20160410");
        customer.setPlace("日本關西");

        // set customer to map for velocity email template
        Map<String, Object> model = new HashMap<String, Object>();
        model.put("customer", customer);

        // get email content from velocity email template
        String mailTemplate = "albert/practice/mail/templates/insurance.vm";
        String content = VelocityEngineUtils.mergeTemplateIntoString(velocityEngine, mailTemplate,
                "UTF-8", model);
        System.out.println("content=" + content);
 }


Check the print result:
 1
 2
 3
 4
 5
 6
 7
 8
 9
10
11
12
13
14
15
16
17
18
content=<html>
   <body>
      <p>親愛的保戶您好</p>
      <p>     </p>
      <p>感謝您對xxxx的支持,您在網路上申請的旅平險保單已投保完成,以下是您的投保明細,供您參考。</p>
      <p>【投保內容】</p>
      <p>保單號碼: 12345678</p>
      <p>被保險人: 測試</p>
      <p>申請日期: 20160325</p>
      <p>保險期間: 20160401 ~ 20160410</p>
      <p>旅遊地點: 日本關西</p>
      <p></p>
      <p>※保險單及保險費送金單將於近日內寄至要保人所指定之聯絡地址。</p>
      <p></p>
      <p>                     敬祝  闔家平安 </p>
      <p><img src="cid:panda"></p>
   </body>
</html>

Reference
[1] http://www.codingpedia.org/ama/how-to-compose-html-emails-in-java-with-spring-and-velocity/

2016/04/08

[Java Mail] Caused by: javax.mail.AuthenticationFailedException: 534-5.7.9 Application-specific password required.

Problem
I am writing a mail sending function by Java Mail API, and using gmail mail server as my smtp server. But as I try to run my testing code, it throw this exception:
 1
 2
 3
 4
 5
 6
 7
 8
 9
10
Caused by: javax.mail.AuthenticationFailedException: 534-5.7.9 Application-specific password required. Learn more at
534 5.7.9  https://support.google.com/accounts/answer/185833 xn8sm19248891pab.15 - gsmtp

 at com.sun.mail.smtp.SMTPTransport$Authenticator.authenticate(SMTPTransport.java:826)
 at com.sun.mail.smtp.SMTPTransport.authenticate(SMTPTransport.java:761)
 at com.sun.mail.smtp.SMTPTransport.protocolConnect(SMTPTransport.java:685)
 at javax.mail.Service.connect(Service.java:295)
 at org.springframework.mail.javamail.JavaMailSenderImpl.connectTransport(JavaMailSenderImpl.java:501)
 at org.springframework.mail.javamail.JavaMailSenderImpl.doSend(JavaMailSenderImpl.java:421)
 ... 4 more


How-To
You can go to https://support.google.com/accounts/answer/185833 to check the root cause.
Google asks you to generate an application specific password instead of your password.


Then I can send email via gmail mail server successfully.

2016/04/06

[Java Mail] com.sun.mail.smtp.SMTPSendFailedException: 530 5.7.0 Must issue a STARTTLS command first.

Problem
I am using gmail as my testing mail server to test Java Mail code.
Here is my test code:
 1
 2
 3
 4
 5
 6
 7
 8
 9
10
11
12
13
14
15
16
17
18
19
20
21
22
23
24
25
26
27
28
29
30
31
32
33
34
35
36
37
38
import javax.mail.MessagingException;
import javax.mail.internet.MimeMessage;

import org.springframework.mail.javamail.JavaMailSenderImpl;
import org.springframework.mail.javamail.MimeMessageHelper;

public class MailTest {

    public static void main(String[] args) {

        String host = "smtp.gmail.com";
        int port = 587;
        String userName = "xxx";
        String password = "xxx";

        String mailTo = "xxx@gmail.com";
        String subject = "Hello my friend~";

        JavaMailSenderImpl sender = new JavaMailSenderImpl();
        sender.setHost(host);
        sender.setPort(port);
        sender.setUsername(userName);
        sender.setPassword(password);

        MimeMessage message = sender.createMimeMessage();
        MimeMessageHelper helper;
        try {
            helper = new MimeMessageHelper(message, true);
            helper.setTo(mailTo);
            helper.setSubject(subject);
            helper.setText("test test");
        } catch (MessagingException e) {
            throw new RuntimeException(e);
        }

        sender.send(message);
    }
}

But as I run this test code, it throw exception as bellows:
1
2
3
4
5
6
7
8
9
com.sun.mail.smtp.SMTPSendFailedException: 530 5.7.0 Must issue a STARTTLS command first. wb7sm14621901pab.3 - gsmtp

 at com.sun.mail.smtp.SMTPTransport.issueSendCommand(SMTPTransport.java:2108)
 at com.sun.mail.smtp.SMTPTransport.mailFrom(SMTPTransport.java:1609)
 at com.sun.mail.smtp.SMTPTransport.sendMessage(SMTPTransport.java:1117)
 at org.springframework.mail.javamail.JavaMailSenderImpl.doSend(JavaMailSenderImpl.java:448)
 at org.springframework.mail.javamail.JavaMailSenderImpl.send(JavaMailSenderImpl.java:345)
 at org.springframework.mail.javamail.JavaMailSenderImpl.send(JavaMailSenderImpl.java:340)
 at albert.practice.mail.MailTest.main(MailTest.java:52)


How-to
We need to enables the use of the STARTTLS command to switch the connection to a TLS-protected connection before issuing any login commands. 

Therefore, the source code would be modified as following:
 1
 2
 3
 4
 5
 6
 7
 8
 9
10
11
12
13
14
15
16
17
18
19
20
21
22
23
24
25
26
27
28
29
30
31
32
33
34
35
36
37
38
39
40
41
42
43
import java.util.Properties;

import javax.mail.MessagingException;
import javax.mail.internet.MimeMessage;

import org.springframework.mail.javamail.JavaMailSenderImpl;
import org.springframework.mail.javamail.MimeMessageHelper;

public class MailTest {

    public static void main(String[] args) {

        Properties props = new Properties();
        props.put("mail.smtp.starttls.enable", "true");

        String host = "smtp.gmail.com";
        int port = 587;
        String userName = "xxx";
        String password = "xxx";

        String mailTo = "xxx@gmail.com";
        String subject = "Hello my friend~";

        JavaMailSenderImpl sender = new JavaMailSenderImpl();
        sender.setJavaMailProperties(props);
        sender.setHost(host);
        sender.setPort(port);
        sender.setUsername(userName);
        sender.setPassword(password);

        MimeMessage message = sender.createMimeMessage();
        MimeMessageHelper helper;
        try {
            helper = new MimeMessageHelper(message, true);
            helper.setTo(mailTo);
            helper.setSubject(subject);
            helper.setText("test test");
        } catch (MessagingException e) {
            throw new RuntimeException(e);
        }

        sender.send(message);
    }


Test successful !

Reference
[1] http://stackoverflow.com/questions/17581066/using-javamail-with-a-self-signed-certificate

2016/04/05

[Python] How to do sorting in Python

Assume I have a Player Class as bellows:
 1
 2
 3
 4
 5
 6
 7
 8
 9
10
11
12
13
'''
Created on 2016/2/3

@author: albert
'''
class Player:
    def __init__(self, team, name, position):
        self.Team = team
        self.Name = name
        self.Position = position
    
    def ToString(self):
        return 'team:' + self.Team + ', name:' + self.Name + ', position:' + self.Position


Here has the code snippet which include add players into list, print players before sort, print players after sorted by player's position and name:
 1
 2
 3
 4
 5
 6
 7
 8
 9
10
11
12
13
14
15
16
17
18
19
20
21
22
23
24
25
26
27
28
from com.cht.Player import *
from operator import attrgetter

''' defined a list of Players'''
players = [
           Player('Lamigo', '陳 金 鋒', '指定代打'),
           Player('Lamigo', '林 柏 佑', '投手'),
           Player('中信兄弟', '彭 政 閔', '一壘手'),
           Player('統一7-ELEVEn', '高 志 綱', '捕手'),
           Player('義大犀牛', '林 晨 樺', '投手'),
           Player('統一7-ELEVEn', '陳 鏞 基', '游擊手'),
           Player('Lamigo', '王 柏 融', '左外野手'),
           Player('義大犀牛', '胡 金 龍', '指定打擊'),
           Player('統一7-ELEVEn', '王 鏡 銘', '投手')
           ]

''' print the list of players before sorted'''
print('\n [before sorted] ')
for player in players:
    print(player.ToString())

''' sort players and position and name '''
sortedPlayers = sorted(players, key=attrgetter('Position', 'Name'), reverse=False)
print('\n [after sorted] ')

''' print the list of players after sorted'''
for player in sortedPlayers:
    print(player.ToString())

The log will print as following:
 [before sorted] 
team:Lamigo, name:陳 金 鋒, position:指定代打
team:Lamigo, name:林 柏 佑, position:投手
team:中信兄弟, name:彭 政 閔, position:一壘手
team:統一7-ELEVEn, name:高 志 綱, position:捕手
team:義大犀牛, name:林 晨 樺, position:投手
team:統一7-ELEVEn, name:陳 鏞 基, position:游擊手
team:Lamigo, name:王 柏 融, position:左外野手
team:義大犀牛, name:胡 金 龍, position:指定打擊
team:統一7-ELEVEn, name:王 鏡 銘, position:投手

 [after sorted] 
team:中信兄弟, name:彭 政 閔, position:一壘手
team:Lamigo, name:王 柏 融, position:左外野手
team:義大犀牛, name:林 晨 樺, position:投手
team:Lamigo, name:林 柏 佑, position:投手
team:統一7-ELEVEn, name:王 鏡 銘, position:投手
team:Lamigo, name:陳 金 鋒, position:指定代打
team:義大犀牛, name:胡 金 龍, position:指定打擊
team:統一7-ELEVEn, name:高 志 綱, position:捕手
team:統一7-ELEVEn, name:陳 鏞 基, position:游擊手


Assume I have a number array, string array, datetime array, I would like to sort by ascendant and descendant. 

Here is the code snippets for utility class:
1
2
3
4
5
6
7
''' reverse=False means sort by ascendant '''        
def sortArrayByAsc(dataArray):
    return sorted(dataArray, reverse=False)

''' reverse=True means sort by descendant '''
def sortArrayByDesc(dataArray):
    return sorted(dataArray, reverse=True)


Test the number array:

1
2
3
4
5
6
7
numberArray = [6, 3, 1, 2, 4, 5]
print('\n Original integer array:')
print(numberArray)
print('Sort integer array by asc:' )
print(utils.sortArrayByAsc(numberArray))
print('Sort integer array by desc:' )
print(utils.sortArrayByDesc(numberArray)) 

Test result:
 Original integer array:
[6, 3, 1, 2, 4, 5]
Sort integer array by asc:
[1, 2, 3, 4, 5, 6]
Sort integer array by desc:
[6, 5, 4, 3, 2, 1]


Test the string array:
nameArray = ['Albert', 'Mandy', 'Fiona', 'Ben', 'Jules']
print('\n Original string array:')
print(nameArray)
print('Sort string array by asc:' )
print(utils.sortArrayByAsc(nameArray))
print('Sort string array by desc:' )
print(utils.sortArrayByDesc(nameArray))

Test result:
 Original string array:
['Albert', 'Mandy', 'Fiona', 'Ben', 'Jules']
Sort string array by asc:
['Albert', 'Ben', 'Fiona', 'Jules', 'Mandy']
Sort string array by desc:
['Mandy', 'Jules', 'Fiona', 'Ben', 'Albert']


Test the datetime array:
import datetime
datetime1 = datetime.datetime.strptime('2015-11-11 10:10:10', '%Y-%m-%d %H:%M:%S')
datetime2 = datetime.datetime.strptime('2014-01-11 12:00:00', '%Y-%m-%d %H:%M:%S')
datetime3 = datetime.datetime.strptime('2016-02-17 11:22:00', '%Y-%m-%d %H:%M:%S')
datetimes = [datetime1, datetime2, datetime3]
print('\n Original datetime array:')
print(datetimes)
print('Sort datetime array by asc:' )
print(utils.sortArrayByAsc(datetimes))
print('Sort datetime array by desc:' )
print(utils.sortArrayByDesc(datetimes))

Test result:
 Original datetime array:
[datetime.datetime(2015, 11, 11, 10, 10, 10), datetime.datetime(2014, 1, 11, 12, 0), datetime.datetime(2016, 2, 17, 11, 22)]
Sort datetime array by asc:
[datetime.datetime(2014, 1, 11, 12, 0), datetime.datetime(2015, 11, 11, 10, 10, 10), datetime.datetime(2016, 2, 17, 11, 22)]
Sort datetime array by desc:
[datetime.datetime(2016, 2, 17, 11, 22), datetime.datetime(2015, 11, 11, 10, 10, 10), datetime.datetime(2014, 1, 11, 12, 0)]


Test the unique list:
names = ['Albert', 'Mandy', 'Mandy', 'Fiona', 'Ben', 'Jules']
print('\n Original name array:')
print(names)
print('Unique name array:')
print(utils.removeDuplicateInList(names))

Test result:
 Original name array:
['Albert', 'Mandy', 'Mandy', 'Fiona', 'Ben', 'Jules']
Unique name array:
['Fiona', 'Ben', 'Mandy', 'Jules', 'Albert']


2016/04/04

[Python] Using Pickle to read/write file

Using pickle is straightforward: import the required module, then use dump() to save your data and, some time later, load() to restore it. 

The only requirement when working with pickled files is that they have to be opened in binary access mode

Here is the code snippet:
 1
 2
 3
 4
 5
 6
 7
 8
 9
10
11
12
13
14
15
16
17
18
19
20
21
''' utilize pickle to write data into file '''
def writeFileWithPickle(path, file, data):
    pickle.dump(data, open(path + '/' + file, 'wb'))

''' utilize picke to read data from file '''
def readFileWithPickle(path, file):
    return pickle.load(open(path + '/' + file, 'rb'))

''' utilize pickle to append data to existing file '''
def appendDataWithPickle(path, file, data):
    try:
        with open(path + '/' + file, 'rb') as fileObject:
            list = pickle.load(fileObject)
            for item in data:
                list.append(item)
            writeFileWithPickle(path, file, list)
    except pickle.PickleError as err:
        print('Fail to append data. Error:' + str(err))
    finally:
        if 'fileObject' in locals():
            fileObject.close()


Reference
[1] http://pythontips.com/2013/08/02/what-is-pickle-in-python/


2016/04/03

[Python] Install Python IDE for Eclipse


PyDev is a plugin that enables Eclipse to be used as a Python IDE (supporting also Jython and IronPython).

It uses advanced type inference techniques to provide features such code completion and code analysis, while still providing many others such as a debugger, interactive console, refactoring, etc.
- See more at: https://marketplace.eclipse.org/content/pydev-python-ide-eclipse#sthash.0052eVTc.dpuf

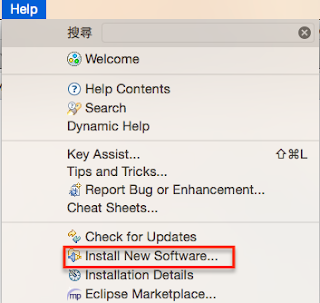
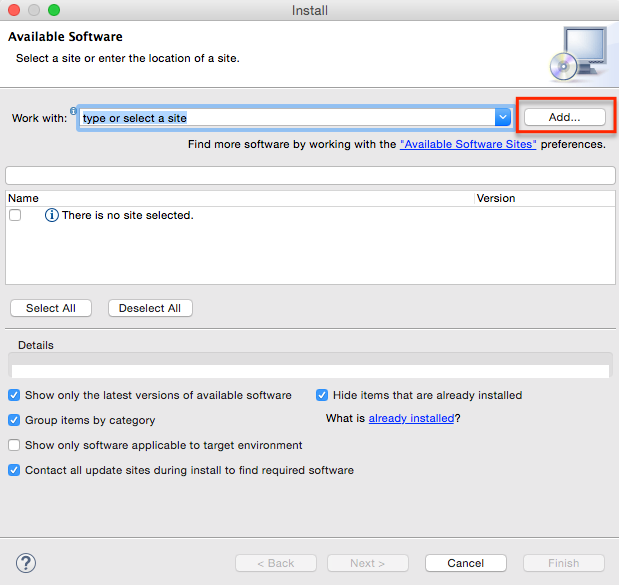
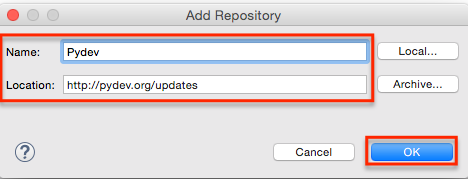
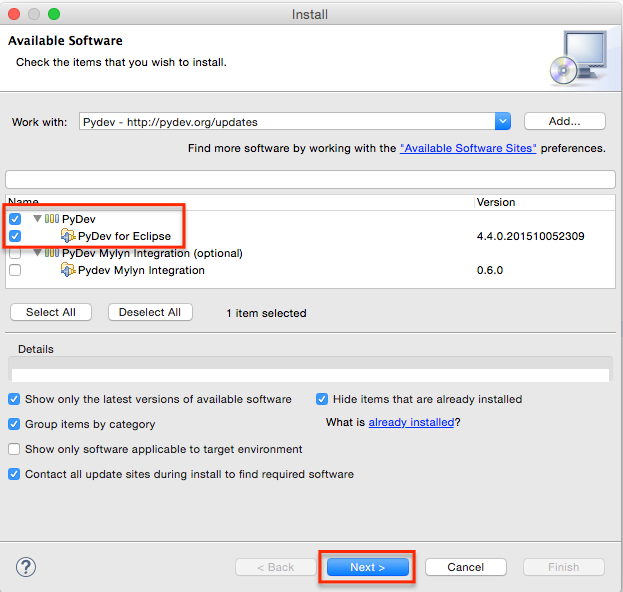
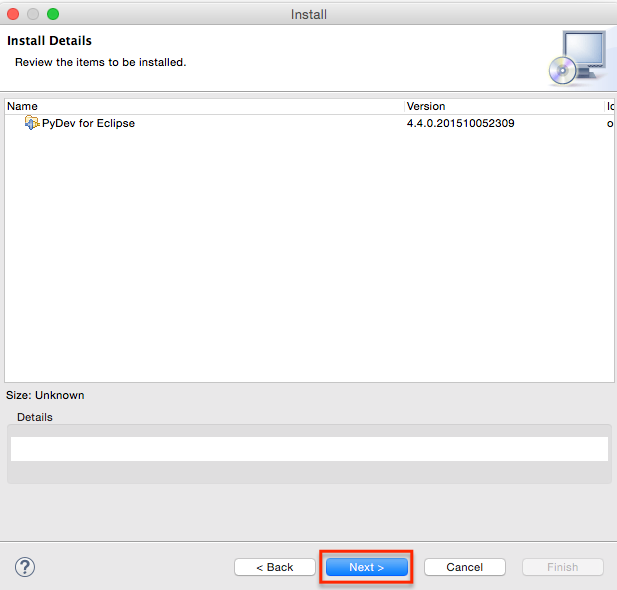
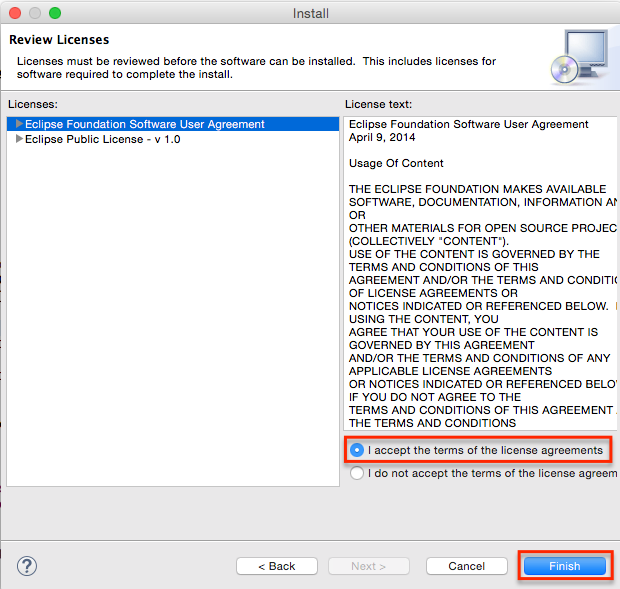
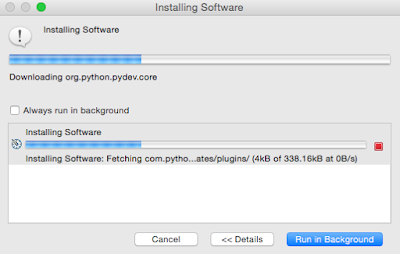
Here is the installation steps:
1. Open Eclipse
2. Help => Install new software


3. Click Add button


4. Fill in name and location, then click OK button


5. Check PyDev and click Next button


6. Click Next


7. Choose I accept option and click Next button


After install PyDev plugin, you need to restart your Eclipse

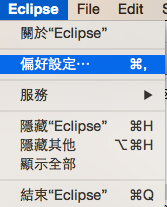
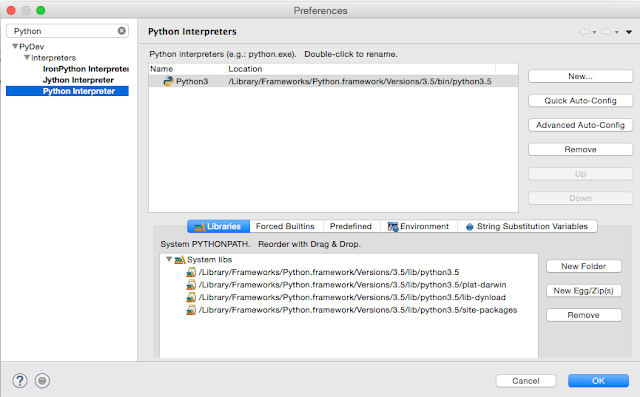
8. Configure Intercepter in preference


9. Choose the interpreter you have installed in your computer


Create a PyDev Module
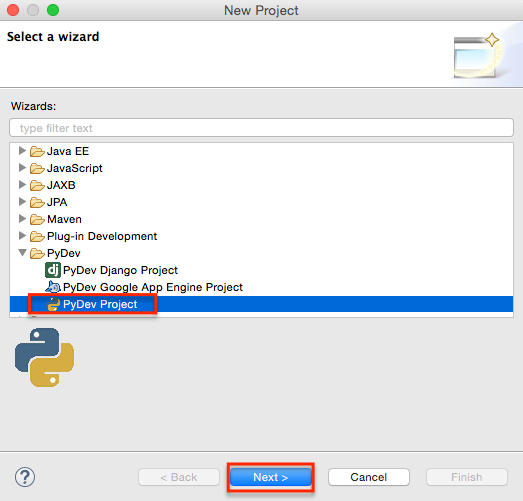
1. create a new PyDevProject


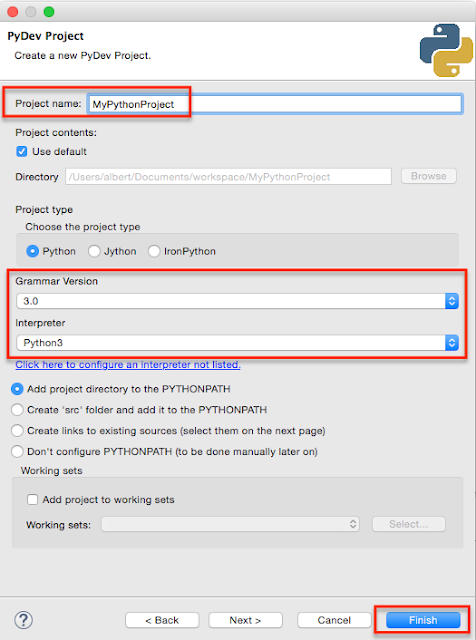
2. Fill in project name, and choose Grammar version & intercepter


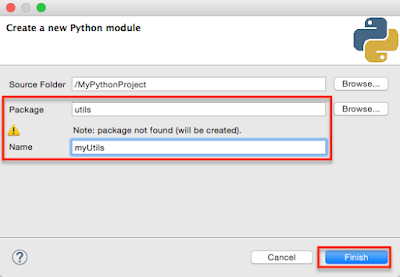
3. Create a utility module which name myUtils


The python code is as bellows:
'''
Created on 2016年1月24日

@author: albert
'''
def printHelloMessage(name):
    print('Hello! ' + name)
    
def addTwoNumbers(num1, num2):    
    return num1 + num2

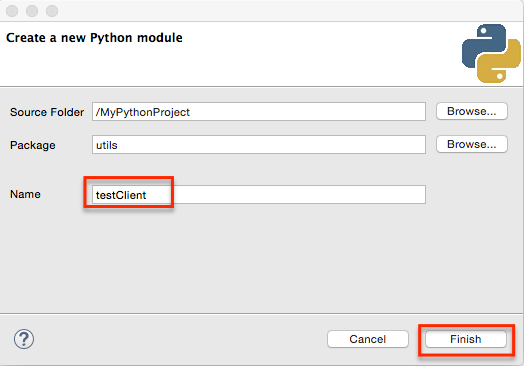
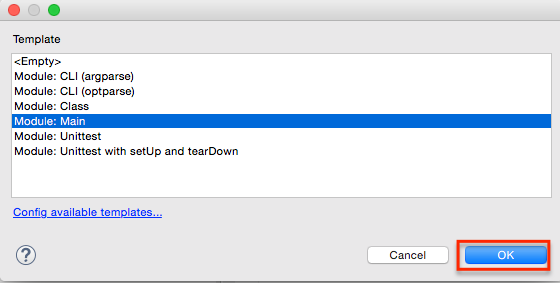
4. Create another test client module to call myUtils


The python code is as following:
'''
Created on 2016年1月24日

@author: albert
'''
from utils import myUtils

if __name__ == '__main__':
    myUtils.printHelloMessage("Albert")
    
    print(myUtils.addTwoNumbers(10, 20))

Here is the test result: